An Experiment in Mold-Making
- pluviophon
- Oct 14, 2022
- 4 min read
Amongst my collection, there is one material that haunts me more than many: the glitter. As I don't really seeing myself using much glitter in future graphite drawings or oil paintings, I thought that resin might be the best form of habitation for my multifarious micro-plastics.
Recently, I came across a pack of reusable silicone beads, meant for making custom molds for UV resin, and thought I'd share my experience in testing it out today.


I baked up a pair of seasonally appropriate Sculpey positives for my tests. A classic little ghost friend and a spooky bat take the stage today, glossed up in varnish, and glued to a used headpin for easier adjustment.
I have a set of silicone baking cups from my last foray with resin crafts, and measured out enough to cover the bottom in a thick layer. I started a heat gun on the beads, per the instructions on the box, and promptly sent the mass of tiny of beads soaring across my studio and taking out at least one wicked witch.
After returning our travelers to their cup, we try again, but from like, a bit farther away, and lower around the cup, working the heat in from the outside, with like patience, or whatever. Once everything was sticking together, I picked the mass up with a toothpick and worked it around a little.
Now, I don't know what possessed this company to put a bare hand holding this molten glob of plastic, but I would like to clarify now that I do not recommend this. Please wear gloves.
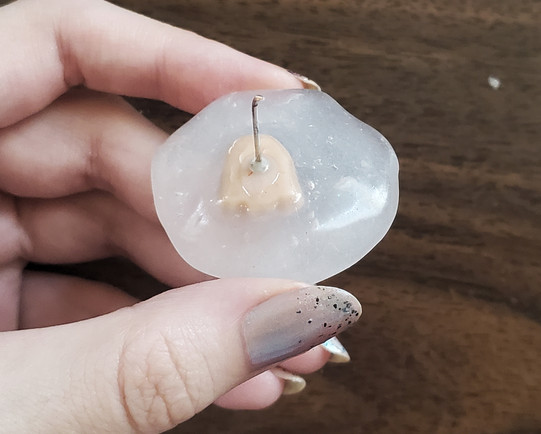
With my gloved fingers, I pressed to silicone into the cup as well as I could to get a somewhat flat surface, and then pressed the front of my bat into the top. One of the harder parts of this process was trying to keep the positive level. Because the silicone didn't get soft enough to really settle out, it was pretty hard to tell what angle I was at. The pin back made it so much easier to check my placement and ended up helping a lot.
Still keeping it hot, I used the sides of the cup to press in on the mold so it would stick to all the sides. The clay wasn't able to really break the surface at this consistency, and with so many detailed edges I wanted to make extra sure those were filled in to get a deep enough relief.


The instructions indicated that this could also be done on a flat silicon mat. I thought this might use a bit less material, since I rarely make anything that requires as much space as a cupcake. So I repeated the process, starting in the cup, with a few less aeronaughts this time around, and pulled the softened mix out on my toothpick. Once it took hold of the mat, I just made a little hill, and dunked my ghost friend in face first. The mold kept its shape really well. It was a bit more awkward (read: sticky) to press in the silicone around the edges, but I got it in well and straight without too much hassle.


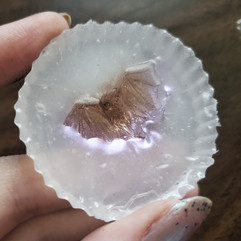
I came back after some hours when they had fully cooled. I was the most worried about my ghost friend. It seemed like maybe some bubbles had collected in his eye holes and I wasn't sure it they would come out right. So starting from the edges (after I tried starting from the center and broke the pin off), I popped the mold from the sided first and then peeled the boy right out. The eyes definitely had some bubbles in them, but the difference in texture looked like it would atleast carry the design. Our bat also came out looking good, and neither of them had other bubbles breaking the surface.
This product is made for UV resin, but we're going for a two-part epoxy this time around. Our glitter mix-ins of the day are clear white iridescent with matching flakes for the ghost, and red glitter behind a soft dusting of bronze and purple mica powder for the bat.


Hark! There they are now!

I'm curious as to how long the molds will last, but I'll probably be scrapping these to do some minor touch-ups. For one, I need to figure out some way around the eyes. They stick out a bit on the final piece, but only at the top, which is just annoying as heck. I think I'll try molding a bead into the face next time before putting it straight in, but I'll have to do a couple more test runs. I'll be sure to update if there's any significant changes.
All in all, I'm really excited to keep playing around with this stuff. It seems really convenient for my uses right now, even where its a bit tedious to work with.
Thank you so much for reading if you've made it this far. I know these have been a long couple of blogs, but I'll get some shorter ones going soon.
-Tilney


Comments